The Tesla Infotainment System is the control center for every Tesla. Instead of having a dashboard with an AC system, radio, and buttons to control the car, Tesla has a tablet that is used in their stead. This tablet will allow you to control almost every aspect of the car.
Let’s dive into detail about the Tesla Infotainment System, what you can expect and what functions you can control with the panel.
Various Infotainment Models
Key Takeaways
- Instead of having a dashboard with an AC system, radio, and buttons to control the car, Tesla has a tablet that is used in their stead.
- Let’s dive into detail about the Tesla Infotainment System, what you can expect and what functions you can control with the panel.
- Various Infotainment Models Depending on which Tesla model you get, the infotainment system may be set up in a slightly different fashion.
- You will find the vertical infotainment display in the Model S and Model X versions, while the horizontal infotainment display is in the Model 3 and Model Y versions.
Depending on which Tesla model you get, the infotainment system may be set up in a slightly different fashion. The biggest difference is a horizontal or vertical display.
You will find the vertical infotainment display in the Model S and Model X versions, while the horizontal infotainment display is in the Model 3 and Model Y versions.
Outside of the main display mechanisms for each Tesla model, you will find the operating system for each of these vehicles to be almost identical, differing mostly in the innate features of each model vehicle.
Infotainment Screens
Let’s dive into each screen you can expect to see and use to control your Tesla. For reference, we will be using a Tesla Model 3 using a horizontal display. That being said, you should find the interface almost identical for most Tesla models.
Left Pane (Stationary)
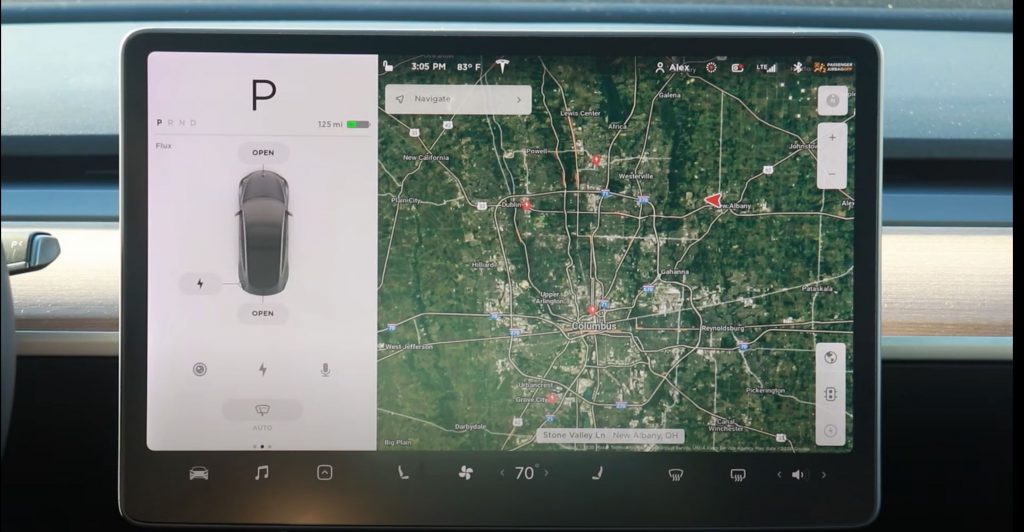
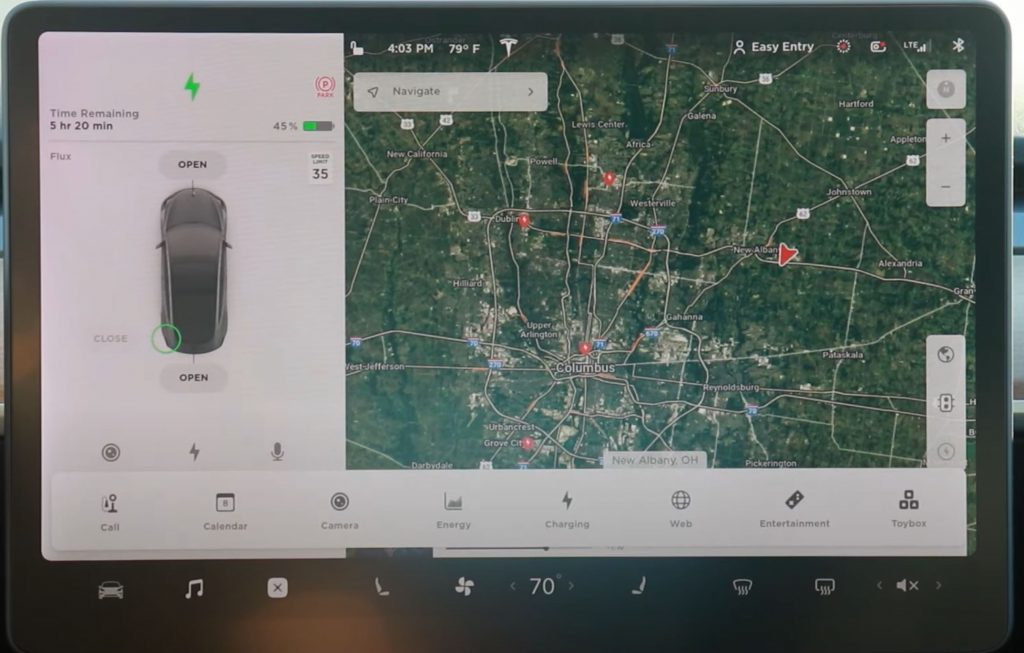
The first pane you should notice when starting the car is the stationary left panel. With this display, you will see general vehicle information such as a model of your car, the current charge, and whether your car is in park, drive, reverse, or neutral.
On the right, you will see a map centered around the car’s current location. When looking at this map you should be able to see the current time and temperature, alongside controls for zooming the map in and out. There should also be a search box that will allow you to search for your destination or other map locations.
Left Pane (Moving)

When the car is moving you will notice the left panel change. While moving the panel will show a bird’s eye view of your car, allowing you to see any obstacles or information surrounding the car. You will notice the digital speedometer displayed instead of the car status (park, drive, reverse, and neutral).
A couple of new additional information will be displayed as you drive your car. One of the new features you might notice is the black bar underneath the current car’s speed. This is your current energy usage. The bigger the black bar, the more energy that is currently being used by the car.
The second piece of information that should pop up is the current speed limit, which should be displayed underneath the car’s current speed in the form of a speed limit sign.
The right version of the map should stay the same unless you have a destination entered, in which case the map will display your directions.
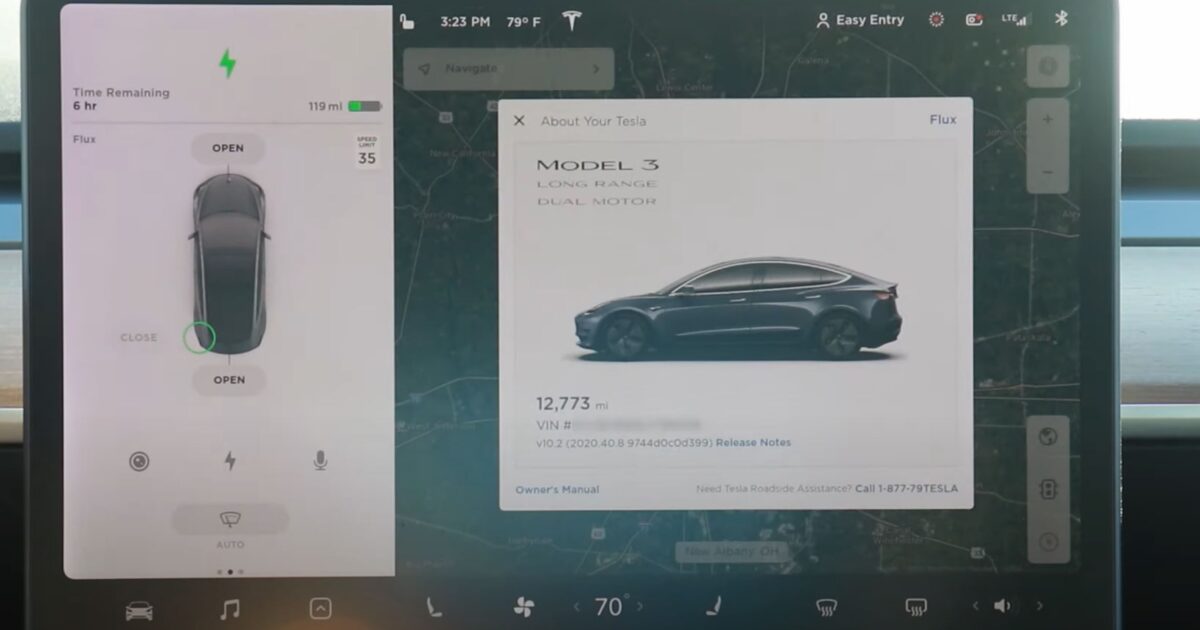
Charging Display
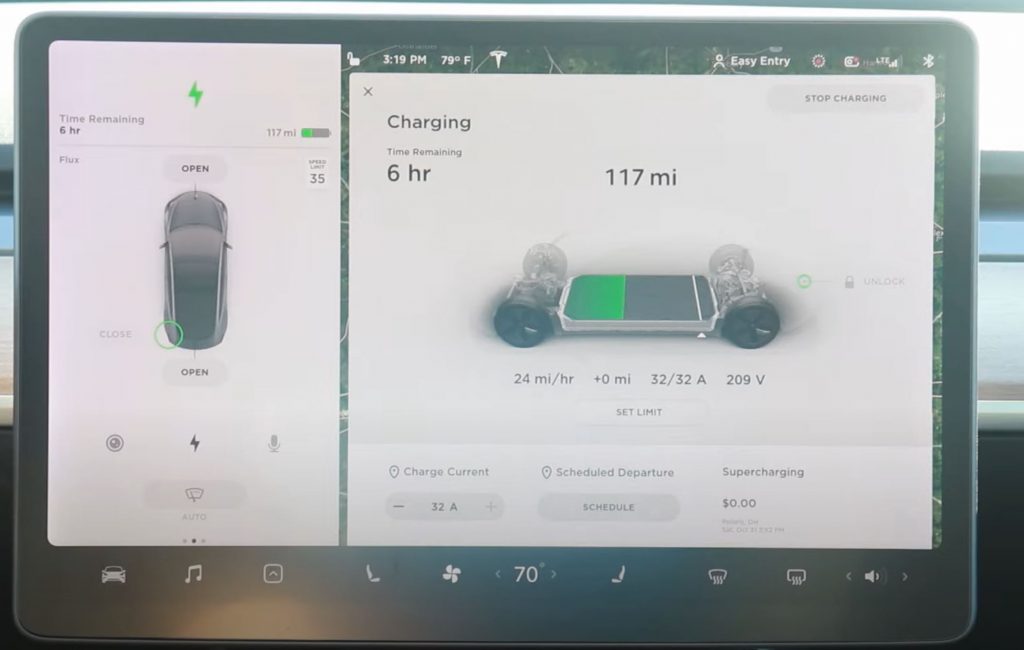
The third state the main panel can be in is charging mode. This mode is activated anytime your car is plugged in to charge. This screen will change the view on the left slightly showing the car is charging, but the main difference is that you will see a new panel pop on top of the map on the right.
This new panel will display a picture of your car battery with charge information surrounding it. The information you can see displays your current mile range based on your charge, time remaining on charging the car, your current charge rate, and how much a supercharger costs if you’re using one.
You should also notice a couple of various options at the bottom of the panel. These options allow you to set a limit on your charge rate.
Top Display Bar
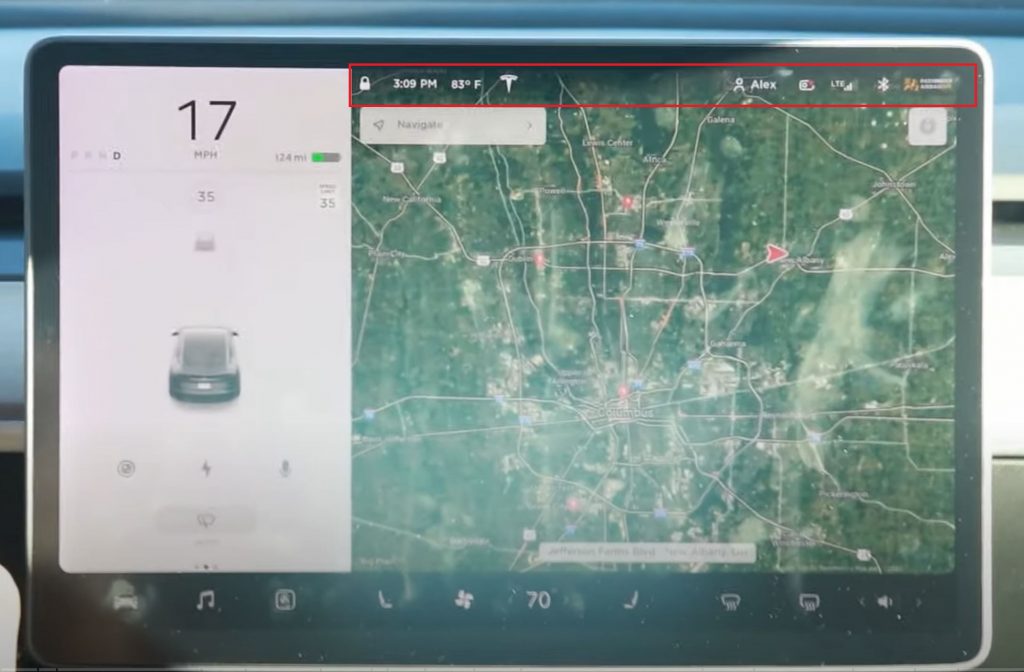
The top display bar will show on the main panel and give you an overview of certain statuses.
Here is what you should see, in order, from left to right:
- Lock Icon: This icon will show whether or not the car is currently locked or not. Clicking this icon will either lock or unlock the car.
- The Current Time: Simply display the current time, based on your timezone.
- Current Temperature: Displays the current temperature based on your location.
- Tesla Logo: Clicking this icon will bring up your car information. This information will display your Model, Customizations, VIN, Odometer, and give you access to the owner’s manual.
- Driver Profiles: The next icon you should see is the current driver profile. Upon clicking this icon you can swap between various driver profiles. There will also be an option to create or edit existing profiles.
- Sentry Mode: This icon will allow you to enable and disable Sentry Mode. If the red dot is displayed within the Icon, it means that Sentry Mode is currently enabled. If you do not see the red dot, Sentry Mode is currently disabled.
- DashCam: This icon will do different things based on your current actions. If you are driving and you click this icon it will save the last 10 minutes of dashcam footage. Otherwise, you will see options to open the viewer which will allow you to navigate saved dashcam footage.
- Wifi: This will display the current strength of your signal. Clicking this Icon will allow you to connect to various networks around you.
- Bluetooth: Clicking on this icon will open up the Bluetooth menu allowing you to pair Bluetooth devices to your car.
These are all the Icons you should see on the top bar of your navigation system panel. These should always be displayed anytime the right map is up on the infotainment system (which should be the case most of the time).
Map and Navigation
The map and navigation display is usually shown to the right of the driver information panel whether you’re stationary or moving. This map will center around your car’s current location.
If you tap anywhere on the map you should see a couple of controls on the right side of the screen appear. In the top right are controls to zoom the map in and out.
On the bottom right you should see three different icons.
These Icons are:
- Satellite View: This button allows you to turn on and off satellite view on your map.
- Traffic: This button will display current traffic levels around you in the forms of various color-coded streets. Red streets are heavy traffic, yellow is medium traffic, and green is light traffic.
- Chargers: This last button, when clicked, will display a panel showing the nearest chargers and will also populate the map showing each charger within your current map display.
Bottom Display Bar
On the bottom of the infotainment screen, you should see various buttons.
Car Settings Section
The first button you will see on the bottom control panel is a car icon and will open the quick control settings.
The second button is for music and will open the control panel for music display and control.
The third button, displayed as an up arrow, will open a menu displaying additional apps installed on your vehicle.
Climate Control Section
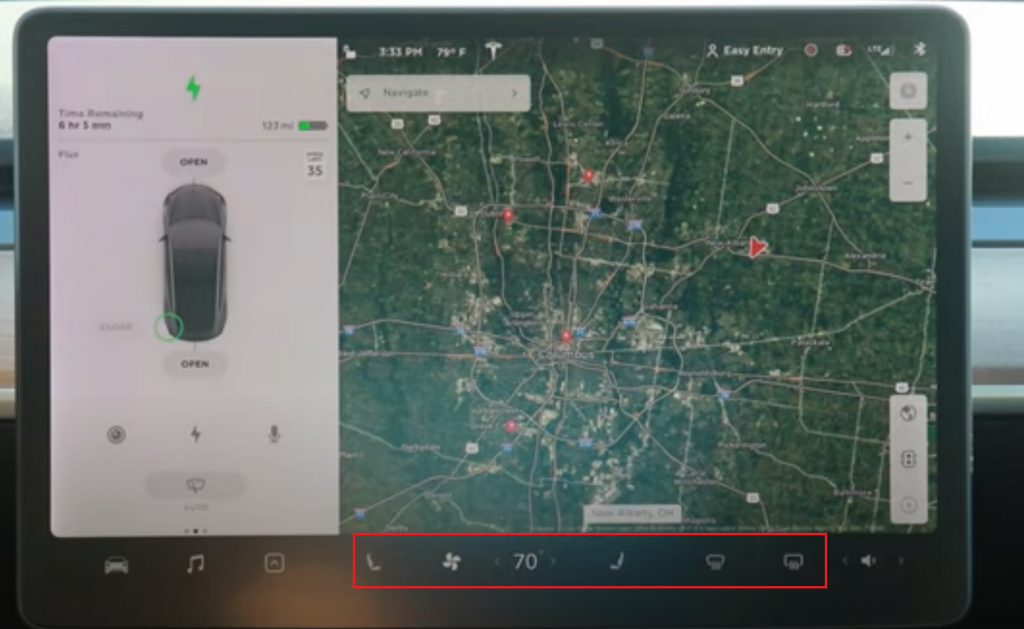
The climate control buttons are displayed on the right side, as shown in the picture below.
The two icons furthest to the right are your window heating and cooling controls. By tapping the left of these two buttons you will turn on front window cooling, tapping it again will change it to heating the front window, and one last tap will turn it back off. The right of the two buttons controls the back window, but only has an option to heat the window, with no option to cool it.
The left buttons on the climate control bar will control your heated seats and the current air temperature of the AC. The fan Icon will turn up and down the volume of air being pushed out of the vents by the car’s AC system.
Volume Control Section
The last section on this bottom control panel is the volume control. These buttons allow you to turn up and down the volume.
Settings Screens
Inside the infotainment system on the Tesla vehicle are the settings screens, these are various options to control your car. The easiest way to pull this screen up is with the bottom panel car button, which opens the quick control settings.
Let’s take a look at each of these individual screens and what they control.
Quick Controls Settings
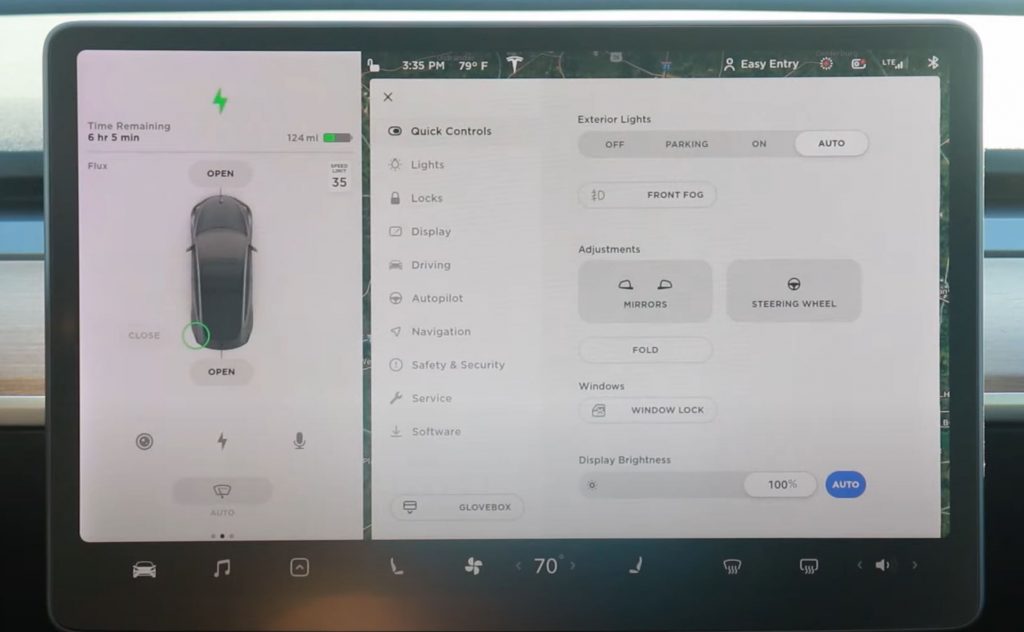
This is the first panel you will see in the settings. Inside of this panel you will be able to change and adjust a couple of key features of your car.
The first option you will see on this screen is the ability to control your exterior lights. You can set these lights to on, off, auto, and parked. Below this is the button to turn on and off your fog lights.
The second section on this panel allows you to adjust both the mirrors and the steering wheel.
After the steering wheel and mirror adjustment settings, you should see the control to lock and unlock your windows. Finally, the last setting is to change the infotainment’s brightness display.
Lights
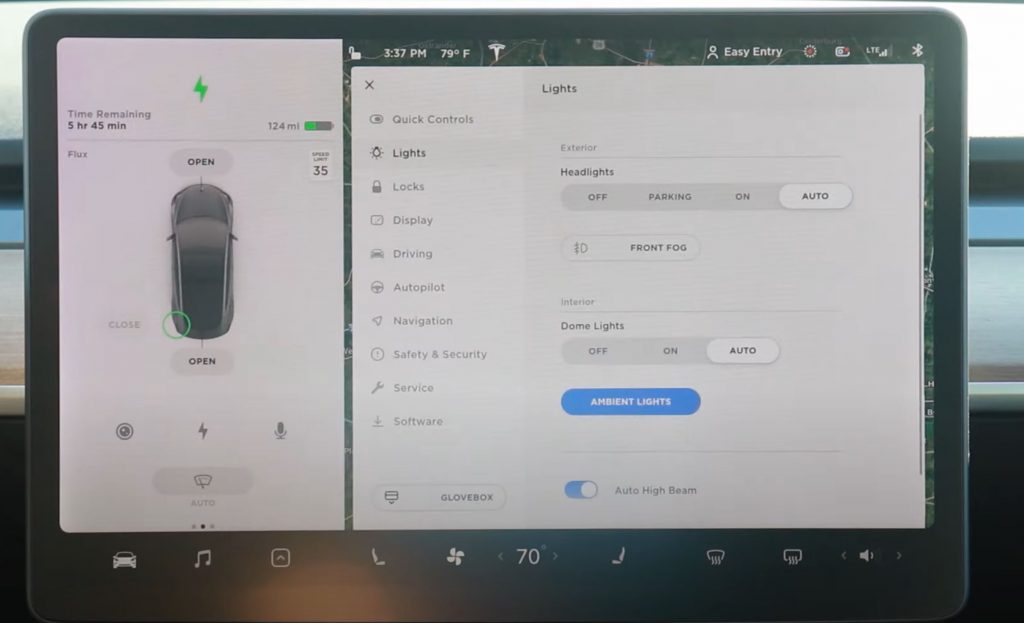
The next panel option you will see on the list is Lights. This section allows you to control all of the various lights on your Tesla.
You may notice a lot of the features on this panel are controllable from the Quick Control Settings panel.
The first options inside this panel are the same as in the quick control settings, which allow you to set the exterior lights to on, off, auto, and parked; As well as to turn on and off the fog lights.
The next option section will allow you to control the interior lights of the Tesla. You will notice an option to turn your dome lights off, on, or auto, and below that you will have the option to turn on and off your ambient lights.
The final option on this panel will allow you to turn on and off your auto high beams.
Locks
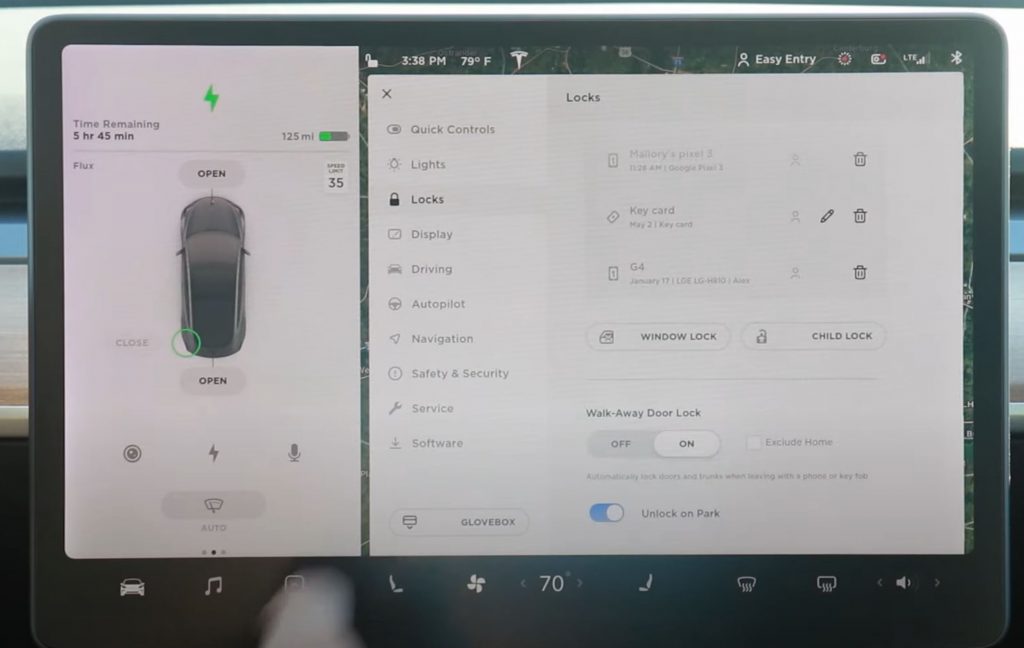
Following the Lights panel is the Locks screen. Inside this screen, you will be able to add, remove, and edit keys that are paired with your Tesla. This includes your phone, key fob, and key card.
Following the panel to modify your keys paired to the vehicle, you will again see the option to lock your windows or turn on the child lock feature.
After the above section, is a section that allows you to turn on and off your walk-away door feature. This is the feature that automatically locks and unlocks your car as a paired key gets closer or farther away from the vehicle. There is an additional toggle for “unlocking on park”.
The final section in this panel is the Car Left Open Notifications. Under this section, you will be able to set up notifications any time a door is left unlocked. You will also be able to toggle the lock confirmation sound and close windows on lock features.
Display
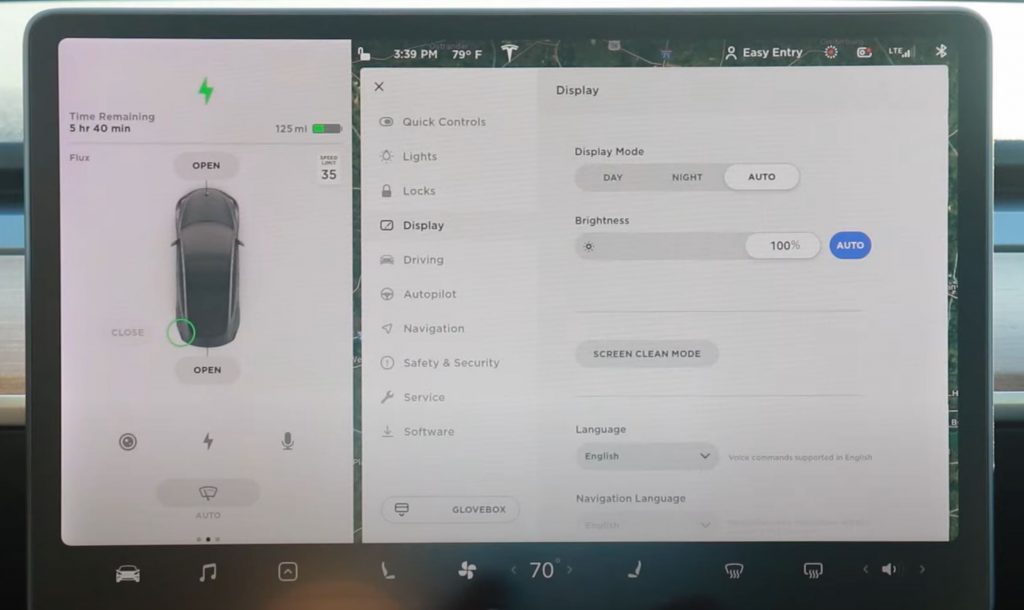
The next section is Display. Under this section, you will be able to control the infotainment center display settings; Things such as display mode and brightness. There is even an optional “clean screen mode” which allows you to clean the screen.
In this section, you will also be able to change the primary language the infotainment system is using as well as the navigation language.
Below the language changes, you should see a section allowing you to change the time format between 12 hours and 24 hours, the energy display, distance from kilometers to miles, temperature from celsius to Fahrenheit, and finally tire pressure from BAR to PSI.
Driving
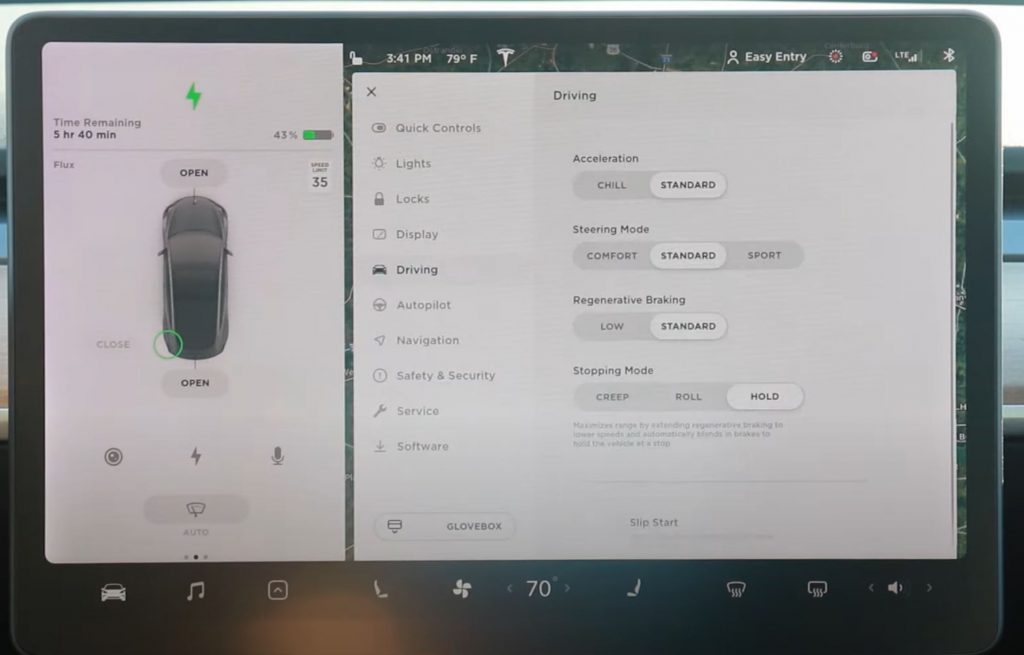
Underneath the Display section is the Driving section. With this panel, you will be able to toggle quite a few features for driving and steering.
The toggles are as follows:
- Acceleration: Chill or Standard
- Steering Mode: Comfort, Standard, or Sport
- Regenerative Braking: Low or Standard
- Stopping Mode: Creep, Roll, or Hold
Below these toggles, you should find the Slip Start option which helps get your car unstuck.
Autopilot
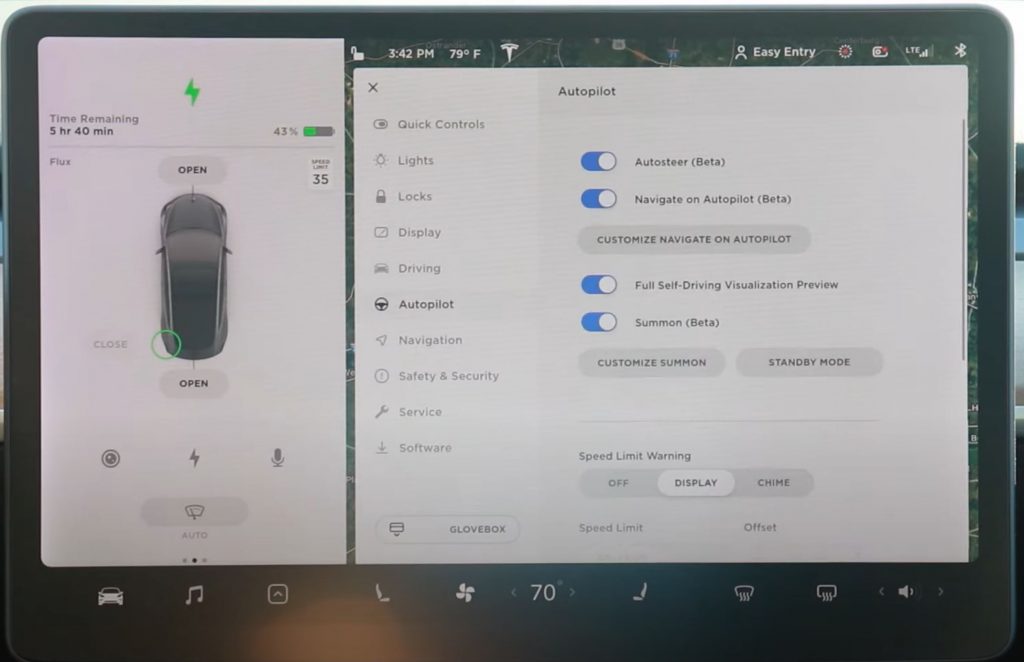
The Autopilot section will allow you to customize how the autopilot will work on your Tesla. There are quite a few core features here worth nothing which will allow you to change how autopilot drives your Tesla.
It’s good to note that this screen will differ radically depending on what type of Autopilot system you have on your Tesla.
Some of the features you might so on this screen allow you to toggle:
- Autosteer
- Navigate on Autopilot
- Full-self driving visualization preview
- Summon
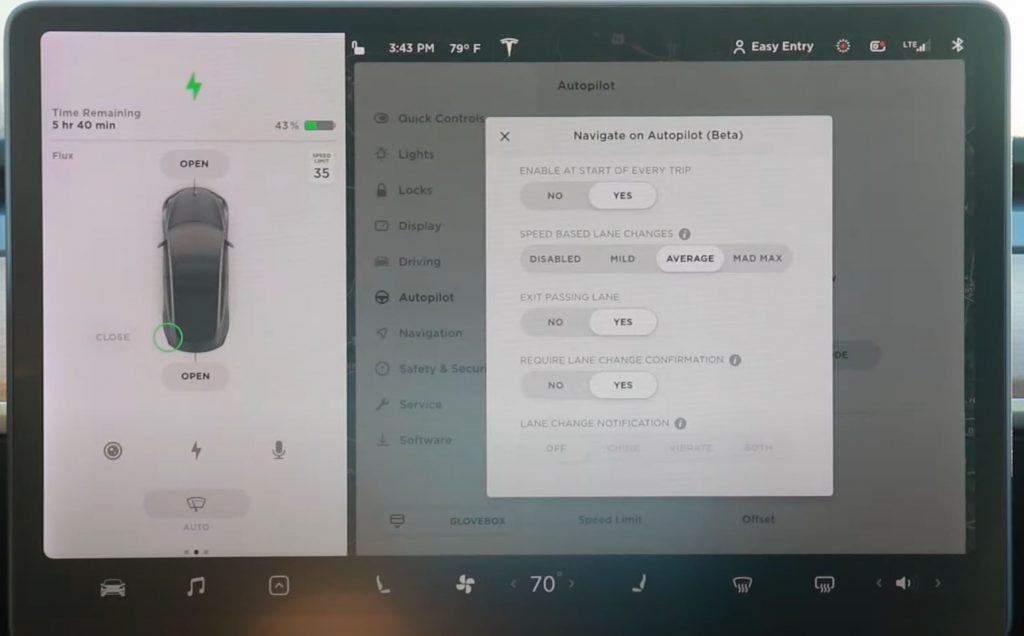
Alongside these toggles, you can find a panel allowing you to further customize the navigate an autopilot feature. This panel gives you several more in-depth options for using the “navigate on autopilot” functionality.
Navigation
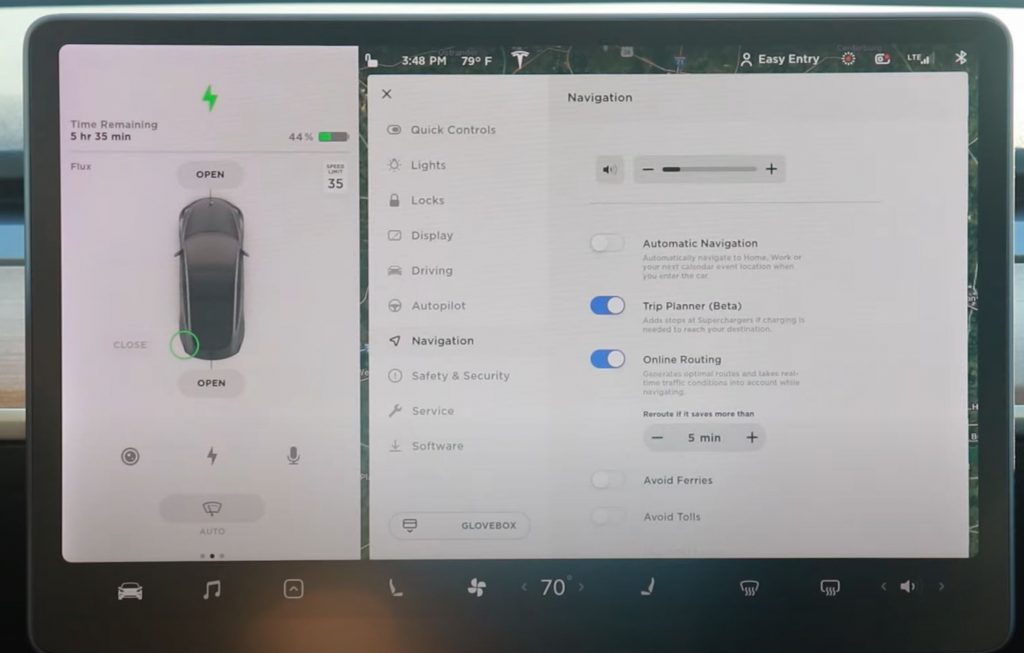
This panel will allow you to customize how your navigation system routes to your destination. Whether you’re planning a trip or are looking to avoid specific routes (things like ferries or tolls), there are quite a few features in this panel that can help you.
In addition to toggling specific navigation features, you’ll also be able to raise and lower the navigation sounds and voice under this panel.
Safety and Security
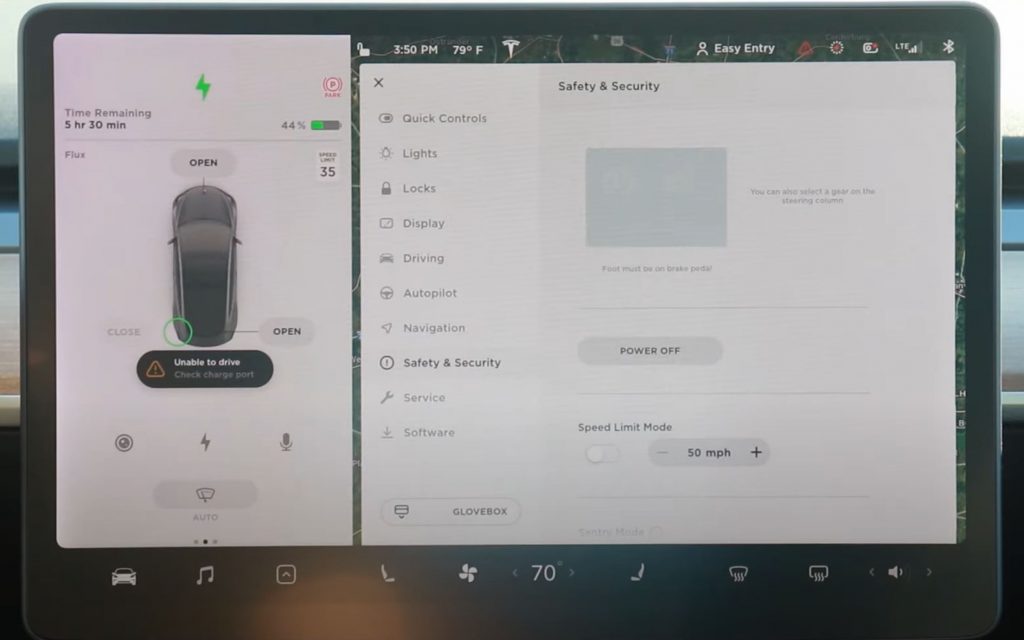
The safety and security panel has a couple of very useful features including the parking brake functionality. While on this screen, and holding down the brakes, you can toggle on the parking brake.
Under this section, you can also power down the entire infotainment system, which can be handy if you’re looking to conserve energy.
The last couple of features in this panel allow you to set a speed limit mode, turn on and off the sentry mode, and configure the dashcam.
Service
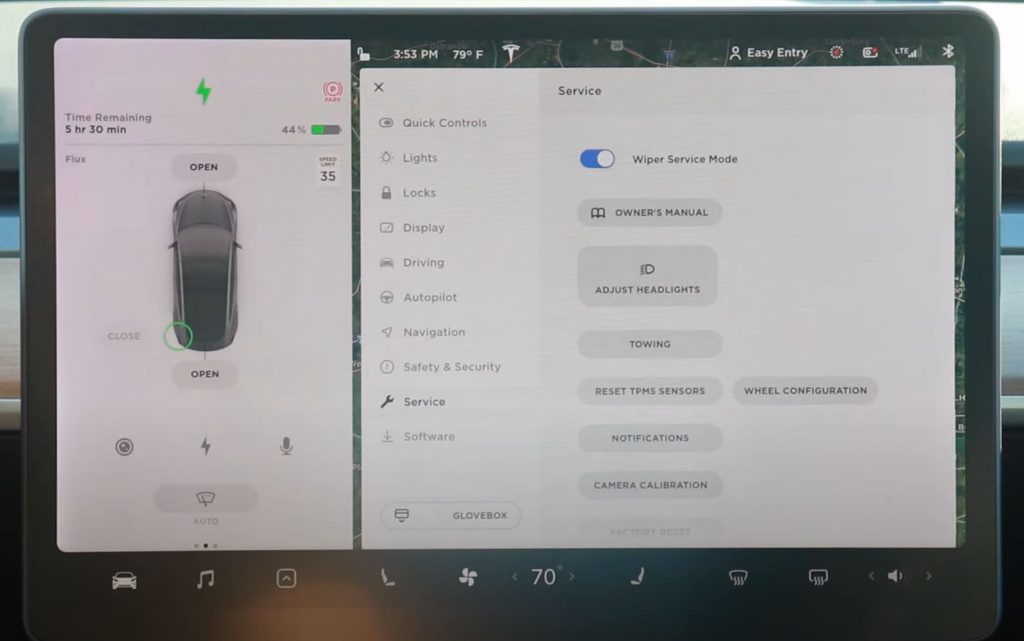
If you’re replacing parts, fixing your Tesla, or bringing it into a service center, this is the panel to use. The settings in this panel will allow you to turn on service mode or configure various systems inside the vehicle when new parts are installed or if parts are modified.
Some of the core features in this panel are good to use if you’re:
- Towing
- Changing Tires
- Calibrating the Cameras
- Adjusting the Headlights
- Changing the Wipers
- Resetting the Operating System
Software
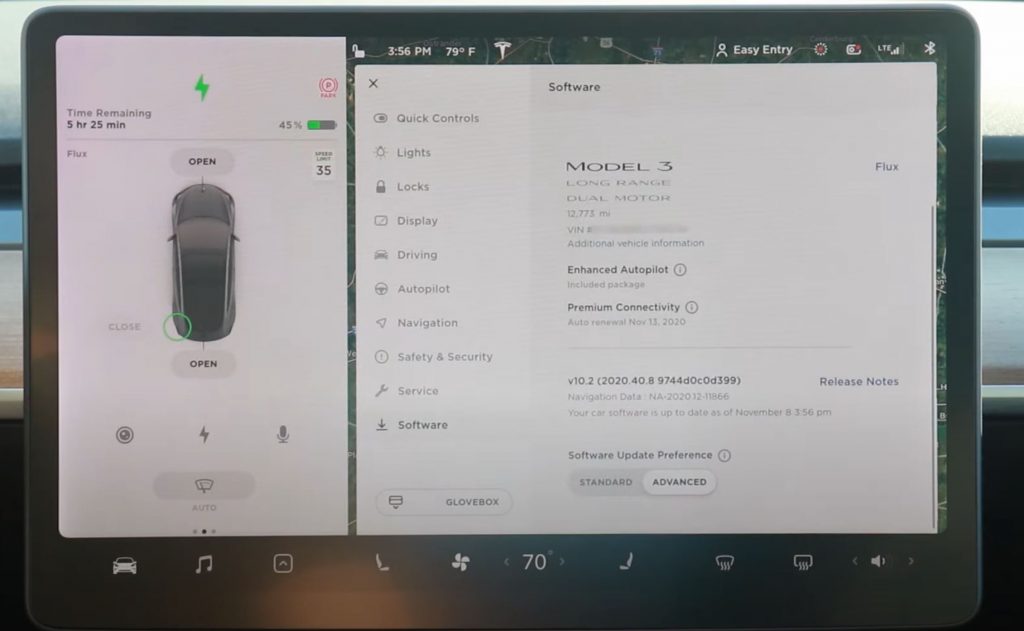
The last panel you should see is Software. In this section, you can view, in a bit more detail, various operating systems and car information versions.
This is also the place where you can set your software update preferences for the infotainment center, as Tesla tends to release somewhat frequent updates for their vehicles.
Additional Applications
The last core screen of the Infotainment system is the additional applications menu. With this menu, you will be able to access some of the more simple menus and functionalities of the infotainment system.
Here are the panels and features you can access:
- Call
- Calendar
- Camera
- Energy
- Charging
- Web
- Entertainment
- Toybox
Each of these features is rather simple but can be nice to access from time to time.
Tesla Infotainment Easter Eggs
Tesla loves to put easter eggs into their products and the infotainment system is no different. Here are a couple of easter eggs you’ll find inside the control center.
Renaming your vehicle
If you rename your Tesla vehicle to “42” it will automatically change your Tesla vehicle’s name to “Life, the Universe, and Everything”.
If you rename your Tesla to “Patsy” you will see a foot come down and stomp the panel, followed by a farting noise, which is a reference to Monty Python.
Secret Modes
There are various secret modes in Tesla vehicles that can be accessed in a couple of different ways. Most of these modes have been added by default to the entertainment panel, but can still be accessed via their “easter egg” method.
Santa Mode: Enabling voice and saying “Ho, ho, ho” will enable Santa mode. This will display snow falling around your vehicle on the infotainment panel.
Mars Mode: To enable Mars mode, hold down the Tesla “T” icon at the top of the touchscreen for about 5 seconds, or until you see a ripple effect. Once released a textbox will appear asking for an access code. Type “Mars” and press okay, which will then activate Mars mode. This will show your vehicle as the Mars Rover on the navigation screen, as well as a background picture of Mars.
Sentry Mode: An easter egg way of enabling Sentry Mode is by activating voice commands and saying “Keep Summer Safe”.
Small Easter Eggs
If you hold down the Call icon underneath additional applications it will change its name to “Ahoy-hoy”.
If you enable Camp Mode, after 10 minutes of inactivity the infotainment screen will change to a video of a log campfire.

Conclusion
As noted above these above examples are shown on the horizontal version of the infotainment system which comes on the Tesla Model 3 and Tesla Model Y. The Tesla Model S and Model X have a vertical version of the infotainment system but have a very similar feature set as the one described above.
Hopefully, you found this information helpful, happy driving Tesla fans.
Frequently Asked Questions
Is Tesla a good investment for EV buyers?
Tesla offers industry-leading technology, extensive Supercharger network, and over-the-air updates. Value depends on individual needs and priorities.
How reliable are Tesla vehicles?
Tesla reliability varies by model and year. Newer models generally show improved build quality, and OTA updates continuously enhance vehicle functionality.
Join the conversation!
Please share your thoughts about this article below. We value your opinions, and would love to see you add to the discussion!